CyberSecurity Project: Transparent Filtering Bridge (+ Extras) 8.0

Sometimes, things take far longer than they should.
This project was not intended to take roughly a year to implement. But massive issues with the Intel WiFi driver that shipped in the FreeBSD OS that OPNSense is based on created an impassible progression blocker. Since my plan was to place a transparent filtering bridge between the modem and router of my network by using a miniPC's ethernet ports, I needed to have a management interface via WiFi.
And if the WiFi wasn't reliable, then I could not access the miniPC at a moment's notice for monitoring or configuration adjustment. Even worse, I would have to take down the entire internet connection and bridge configuration, since I would have disconnect the miniPC from the router, connect it to a PC, set a static IP on the ethernet port, and use that as a management interface... then reconfigure that port for use in the bridge.
This was clearly a non-viable solution, but luckily, things changed in my favor.
Table of Contents
What Changed?
Two main things:
- A number of updates to the driver in question (
iwlwifi), with the latest being in mid-May 2025. - OPNSense 25.1.8 integrating a number of FreeBSD commits (which included the
iwlwifi) commits.
With the high probability that the new driver updates would solve the problems and were integrated into OPNSense, I rolled the dice and installed a fresh copy of OPNSense onto the miniPC.
Initial Results
Thanks to my prior experience with OPNSense installation, the process went smoothly, although in a somewhat time consuming manner due to the speed of the USB drive installation media.
Having documented the process of installing the Realtek ethernet driver required to enable the miniPC's ethernet ports, I referred to my own past writing to complete that task.
The install media only provided OPNSense 25.1, which had enough of the driver updates to mitigate the usual errors that interfered with WiFi connectivity. However, despite utilizing the console and webGUI, I could not get the miniPC to connect to WiFi network.
So I chose to brute force the connection via the shell, querying Bing Copilot:
Below are two common methods to have your
wpa_supplicantrules execute automatically on boot in OPNsense (which, being FreeBSD‑based, uses the traditional rc system). You can either create a custom rc.d startup script or add the command to your/etc/rc.localfile.Method 1: Creating a Custom rc.d Script
1. Create the Script File
Open your favorite editor and create a file (for example,/usr/local/etc/rc.d/wpa_supplicant) with the following content. Adjust the interface (here shown aswlan0), driver (if needed), and path to your configuration file:
#!/bin/sh## PROVIDE: wpa_supplicant# REQUIRE: NETWORKING# KEYWORD: shutdown. /etc/rc.subrname="wpa_supplicant"rcvar=wpa_supplicant_enablecommand="/usr/sbin/wpa_supplicant"command_args="-B -i wlan0 -c /etc/wpa_supplicant.conf"load_rc_config $name: ${wpa_supplicant_enable:=NO}run_rc_command "$1"
2. Make the Script ExecutableRun the following command to ensure your new script can be executed:
chmod +x /usr/local/etc/rc.d/wpa_supplicant
3. Enable the Service
Add the following line to/etc/rc.conf.localto tell the system to start your script on boot:wpa_supplicant_enable="YES"
4. Test Your Setup
Manually start it with:/usr/local/etc/rc.d/wpa_supplicant start
Verify that the process is running (usingpsor checking your logs) before performing a reboot.
With this script, wireless connectivity was achieved once the firewall was disabled. I then initiated an update to get the latest patch.
The 25.1.8 Problem
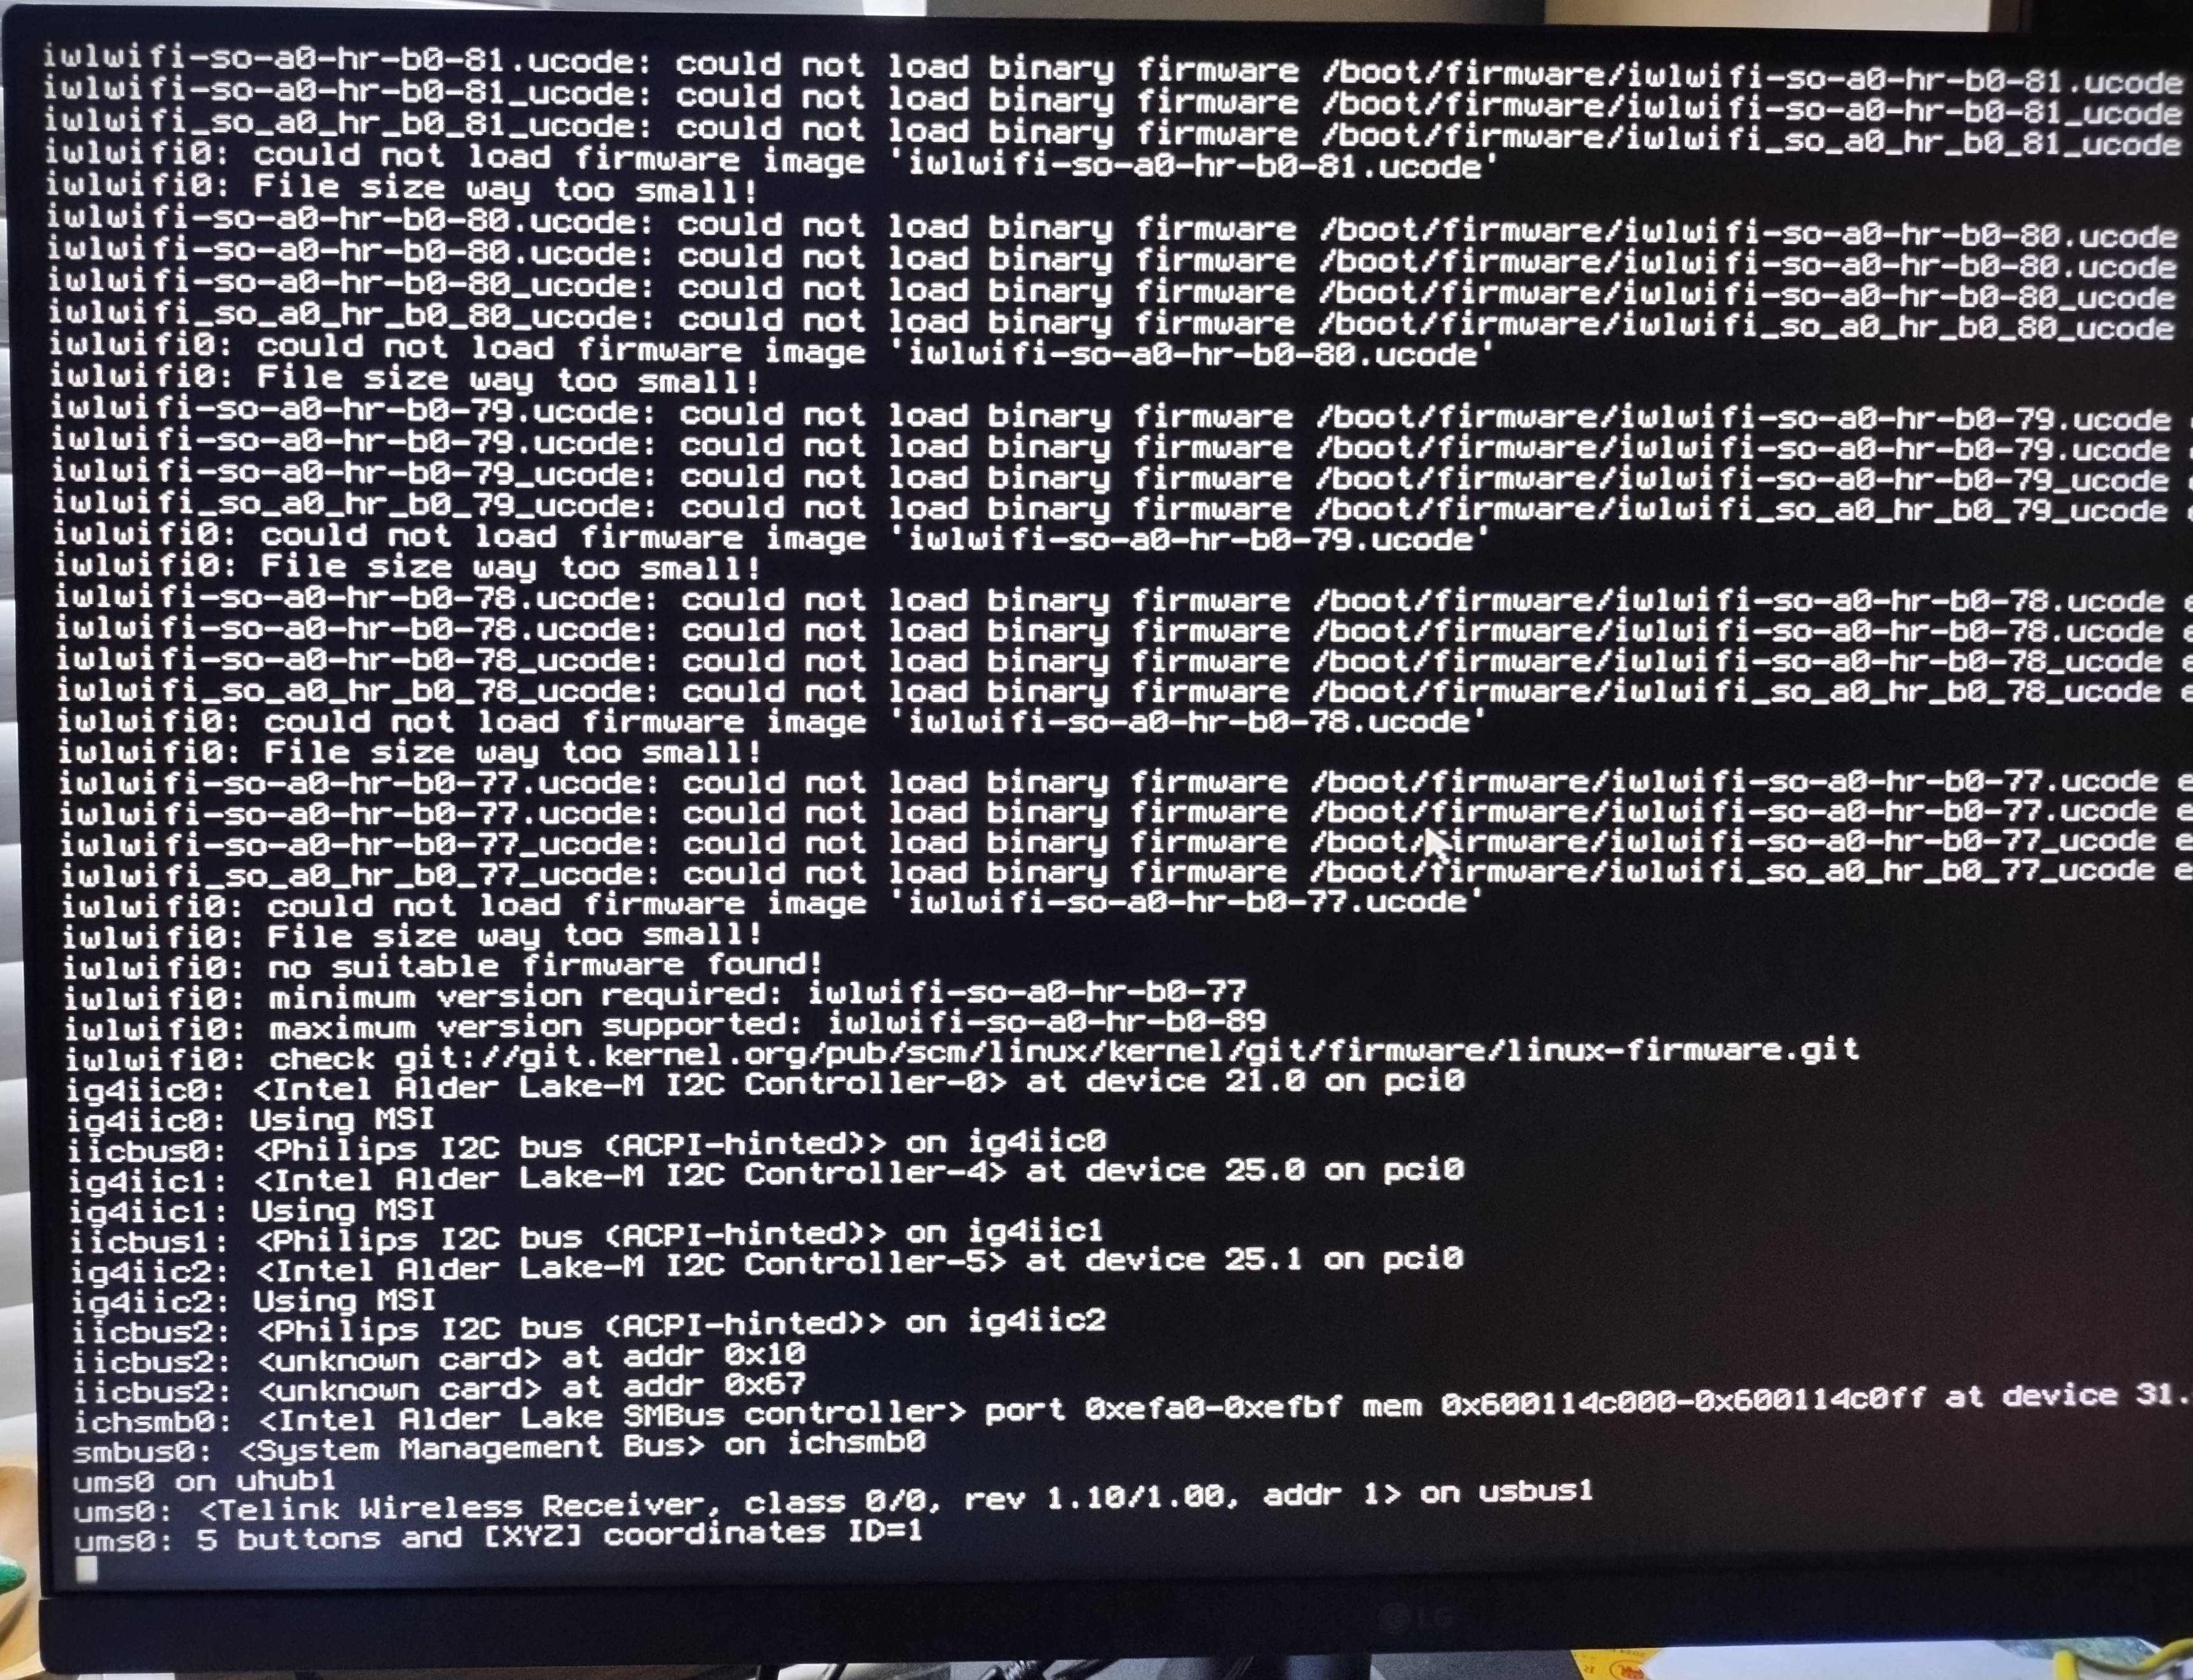
However, once I updated to 25.1.8, I noticed a major issue - there was no IP address associated with the WiFi interface. Rebooting revealed errors related to the firmware for the WiFi card:
Looking at the 25.1.8 release notes indicated that this was an intentional omission:
o src: iwlwififw: remove Intel iwlwifi firmware from src.git
My initial plan to solve this issue was to simply find a copy of the file from a reputable source, download it, and copy it to the /boot/firmware directory. Unfortunately, anything I downloaded off the internet produced the following error:
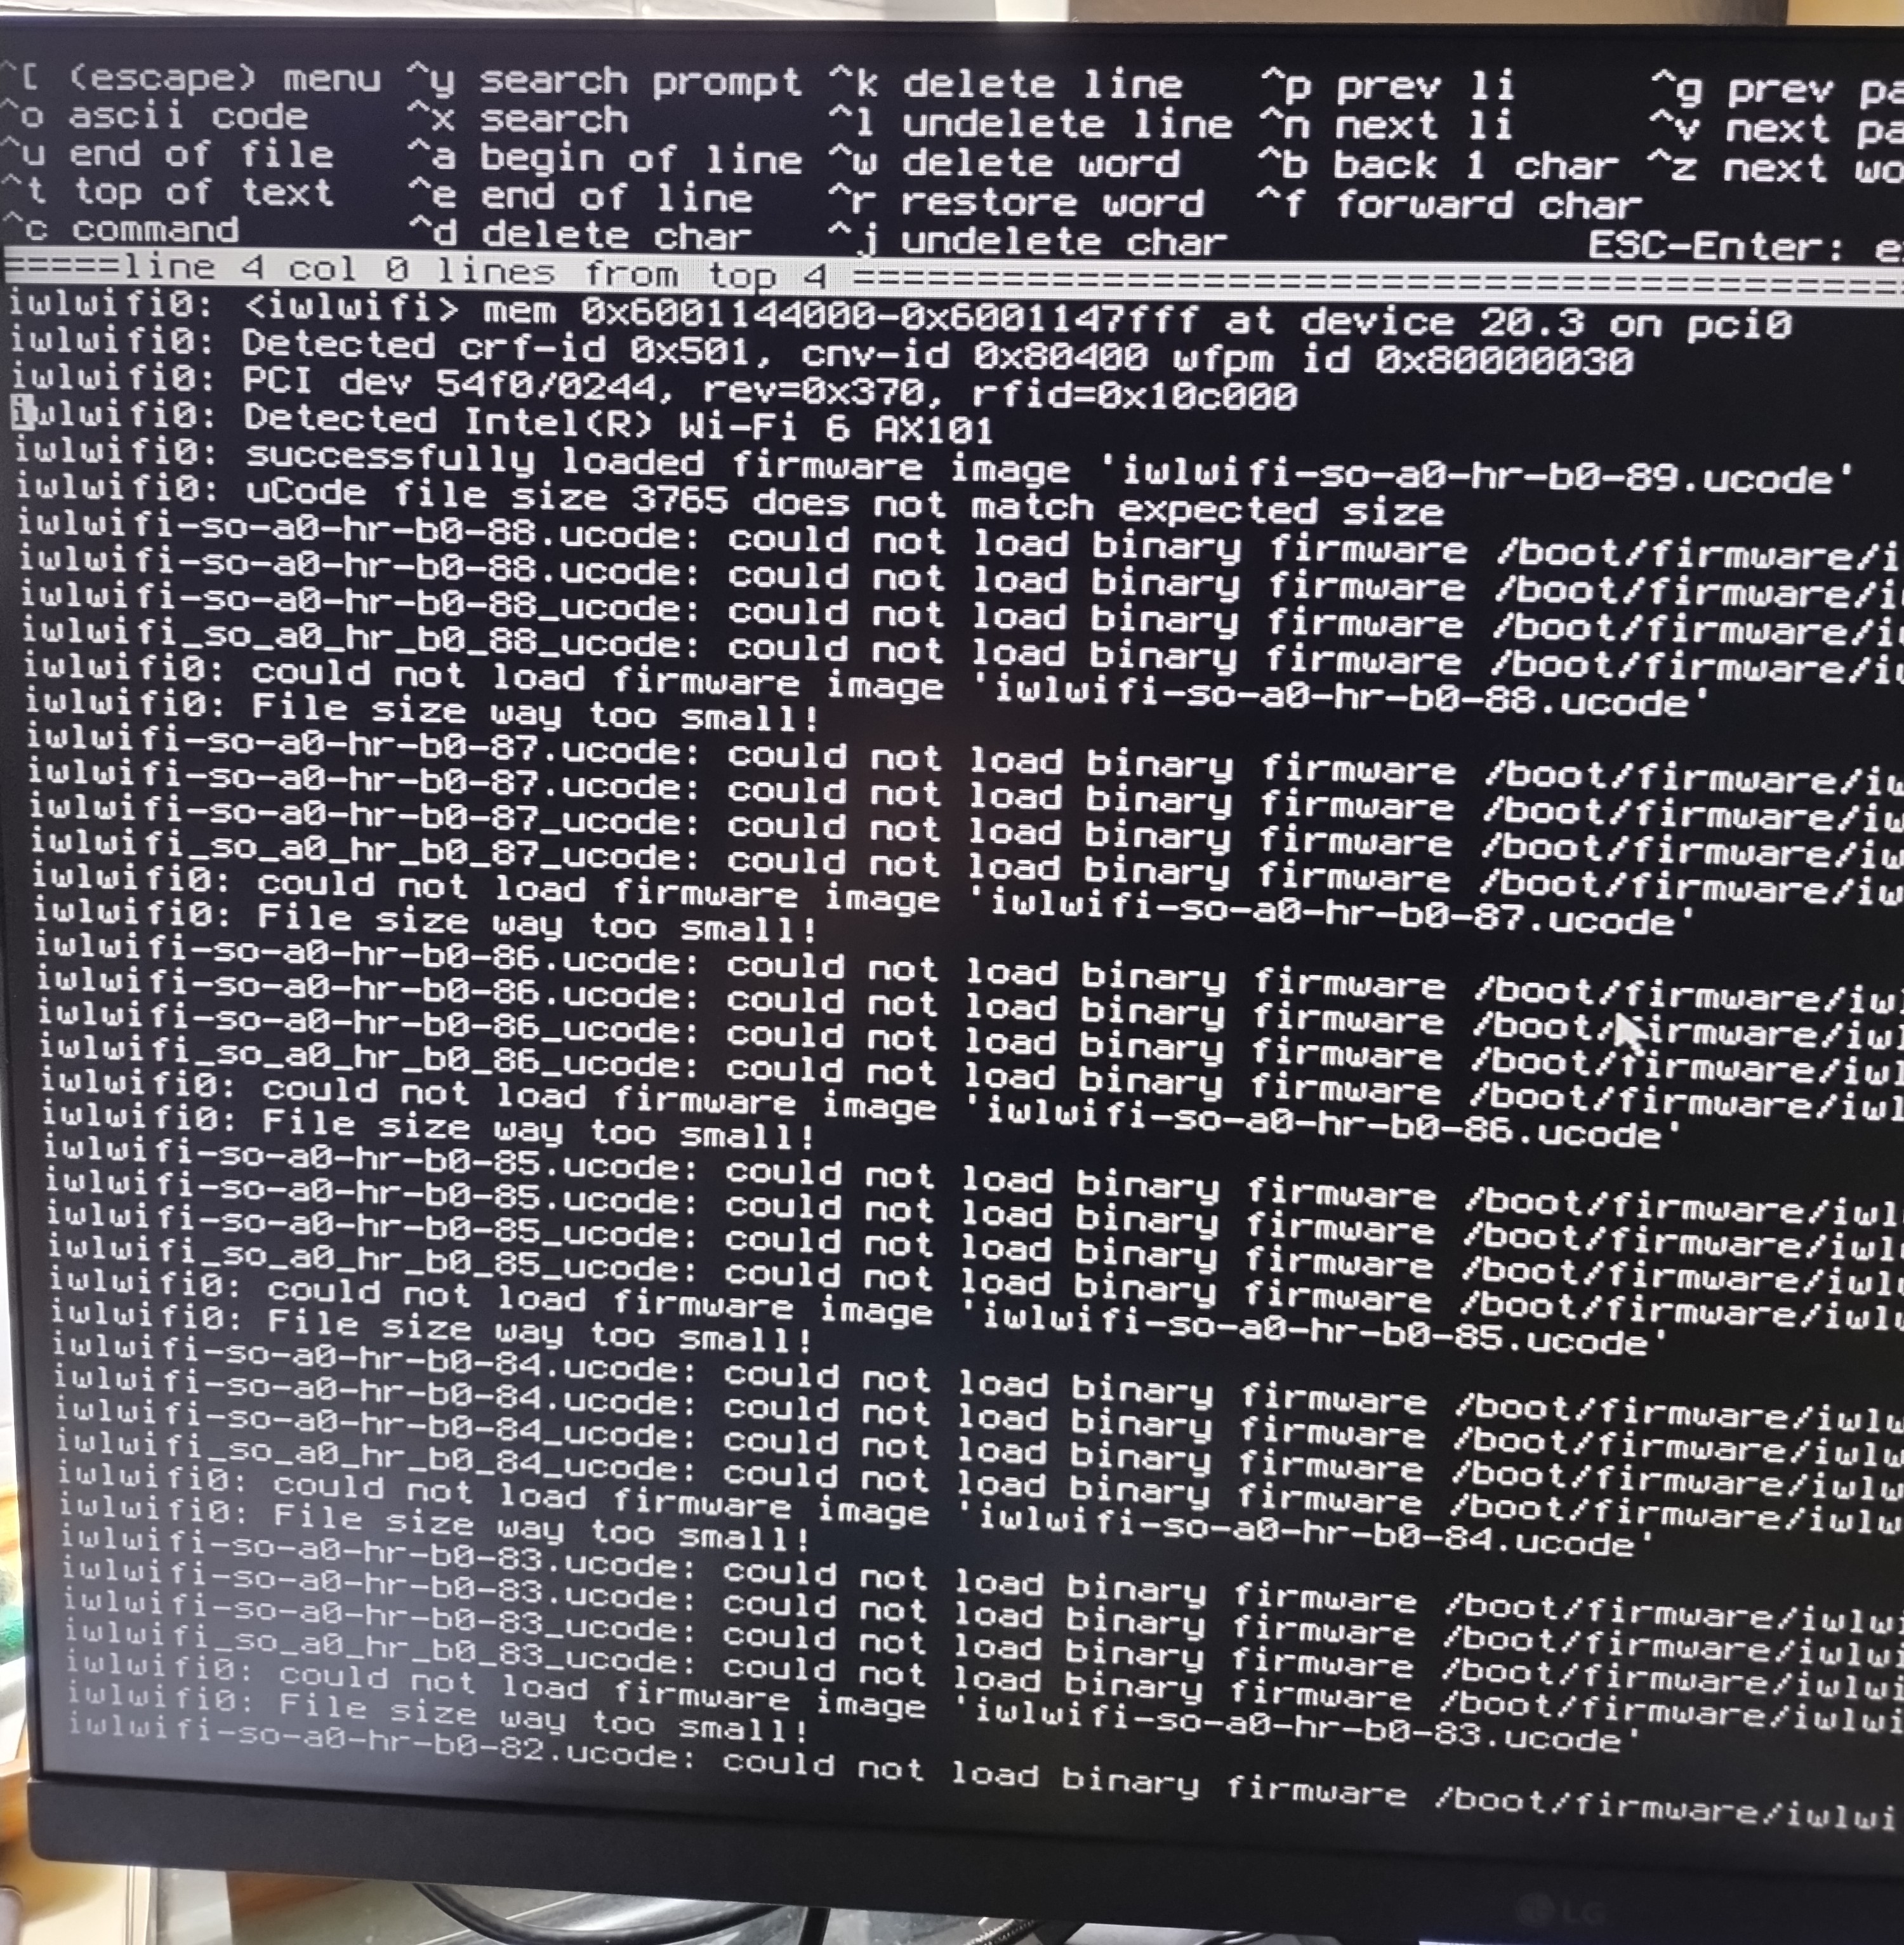
This forced me to setup Windows Subsystem for Linux (WSL), then clone the repository containing the Intel WiFi firmware, and compile it. The resulting file was 1.45MB, and that allowed the WiFi card to boot. (I have a new Github repo for hosting these files.)
Having regained the WiFi connection, I then had to troubleshoot the connection issue.
The State Problem
Looking over the final iwlwifi bug report entries pointed me in a new direction for the issues with WiFi connection and the firewall:
A commit in branch releng/14.3 references this bug:
URL: https://cgit.FreeBSD.org/src/commit/?id=36174c38f9e3433e7fdb8b2f2923499dff67b2e7
commit 36174c38f9e3433e7fdb8b2f2923499dff67b2e7
Author: Bjoern A. Zeeb <bz@FreeBSD.org>
AuthorDate: 2025-05-12 15:12:39 +0000
Commit: Bjoern A. Zeeb <bz@FreeBSD.org>
CommitDate: 2025-05-15 19:13:58 +0000
LinuxKPI: 802.11: make sure AUTH frames are not being sent if BSS changed
iwlwifi keeps logging 'Invalid TXQ id' even after previous changes to
catch the BSS changed. The reason for this is that we do not error in
the SCAN -> AUTH path as otherwise we would not have the state machine
get us back to SCAN to clear up firmware state before auth/assoc to the
new BSS.
If we are not in synch as net80211 just swapped the iv_bss from under us,
disable the TX queue for the (old) lsta to prevent the AUTH frame sent
from sta_newstate() reaching the driver. After all we are not trying to
authenticate to that node (sta) anymore.
Sponsored by: The FreeBSD Foundation
PR: 274382
Approved by: re (cperciva)
(cherry picked from commit 16d987fe781780100a31df30b9edd79ebb54f957)
(cherry picked from commit e0692e7bb6e8abcc55a2510dceea5f83e823a827)
sys/compat/linuxkpi/common/src/linux_80211.c | 24 ++++++++++++++----------
1 file changed, 14 insertions(+), 10 deletions(-)
The key phrase in there is "the state machine."
What if monitoring the state of the connection was causing the problems? What if it was blocking connections because the driver wasn't updating states properly?
To test this out, I created the following three rules:
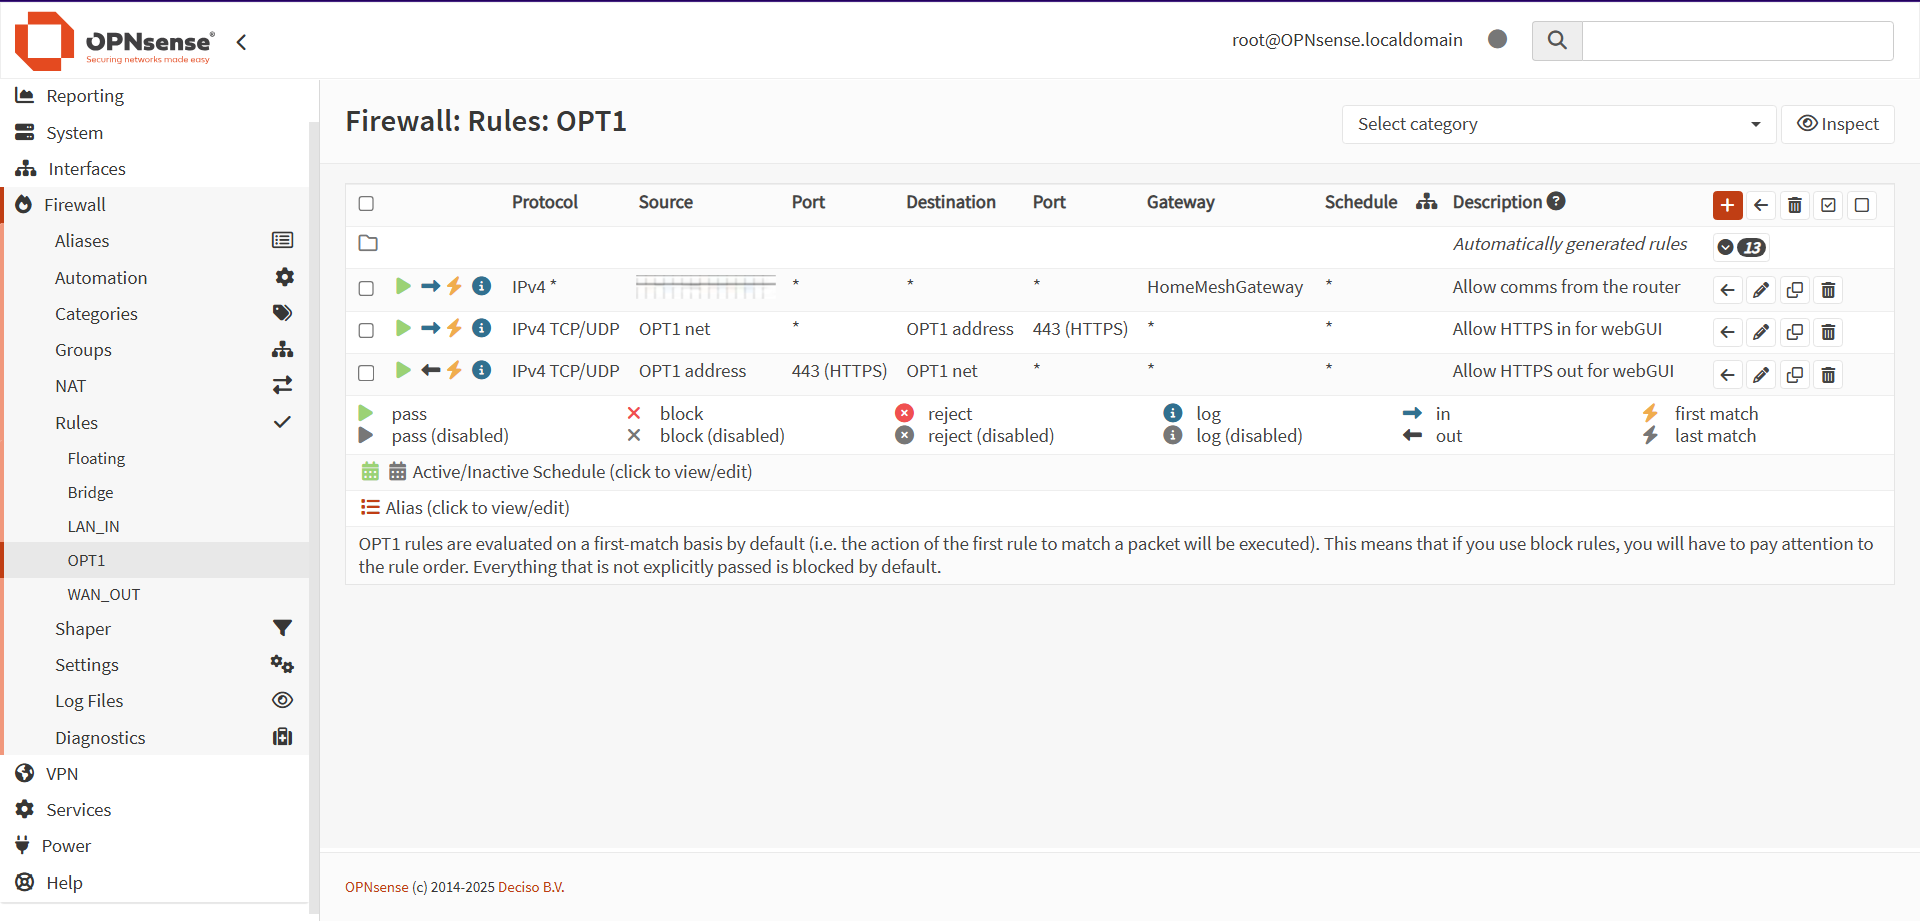
The first rule would allow in all connections from the gateway router to the firewall. The second would let in HTTPS connections from any device on the network the WiFi interface was connected to. The third would let out HTTPS connections to that network.
These rules were configured through the webGUI on one of the ethernet interfaces, allowing me to re-enable the firewall and iterate through various settings.
Implementing the gateway router rule allowed me to ping the miniPC and ping other hosts from the miniPC, along with ensure that the router received a response to its queries. This did not resolve issues with the webGUI, but at least resolved issues regarding general connectivity.
The HTTPS in rule did not immediately provide connectivity, so I began experimenting with the states.
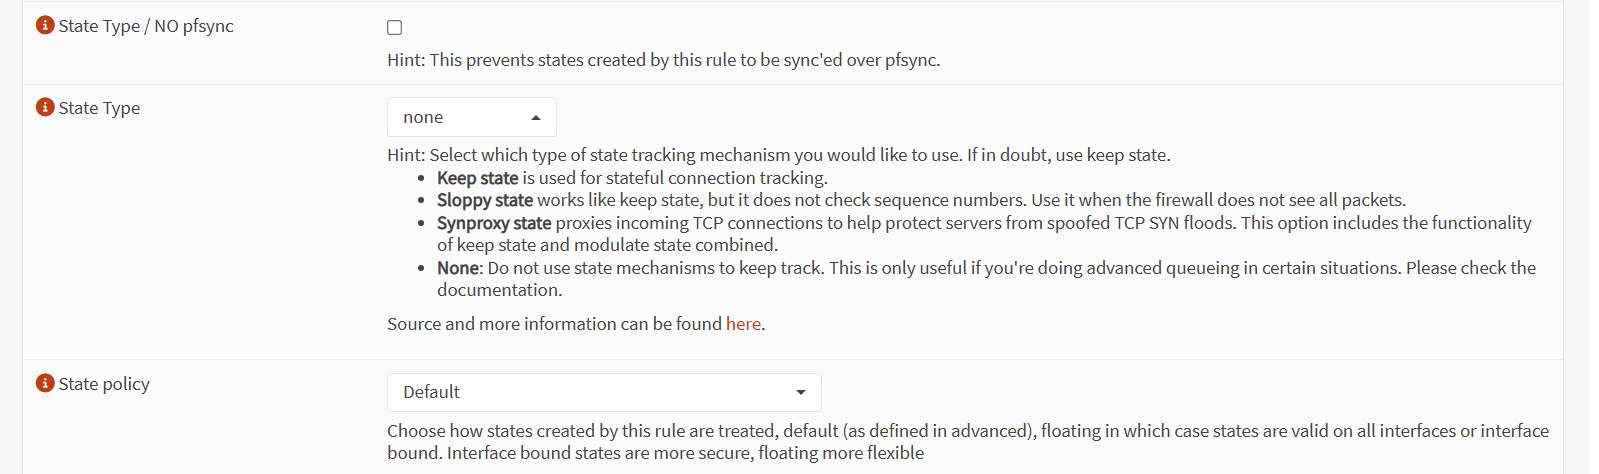
Since the initial Keep state option was causing the issues, I chose to use the Sloppy state option next. This did not allow for webGUI access over the WiFi connection either. For whatever reason, None was the proper value, and that allowed me to consistently connect to the webGUI.
Unfortunately, there was a caveat to this, which I'll get into later.
Uploading Aliases
The last two articles I did regarding this project showed how to create Alias lists for blocking purposes.
Following the steps outlined in those posts, I generated updated lists of IPs to block on the bridge, and uploaded them to OPNSense. I vetted them to ensure that no false positives were being generated by the Python scripts.
For some reason, there was a certain subset of IP addresses with an 8.#.#.# structure that OPNSense refused to accept as valid IPs. These prevented me from uploading Aliases until they were removed.
Configuring the Transparent Filtering Bridge
With network connectivity secured and the aliases uploaded, setting up the transparent filtering bridge was simple and straightforward, thanks to the above tutorial and past experience.
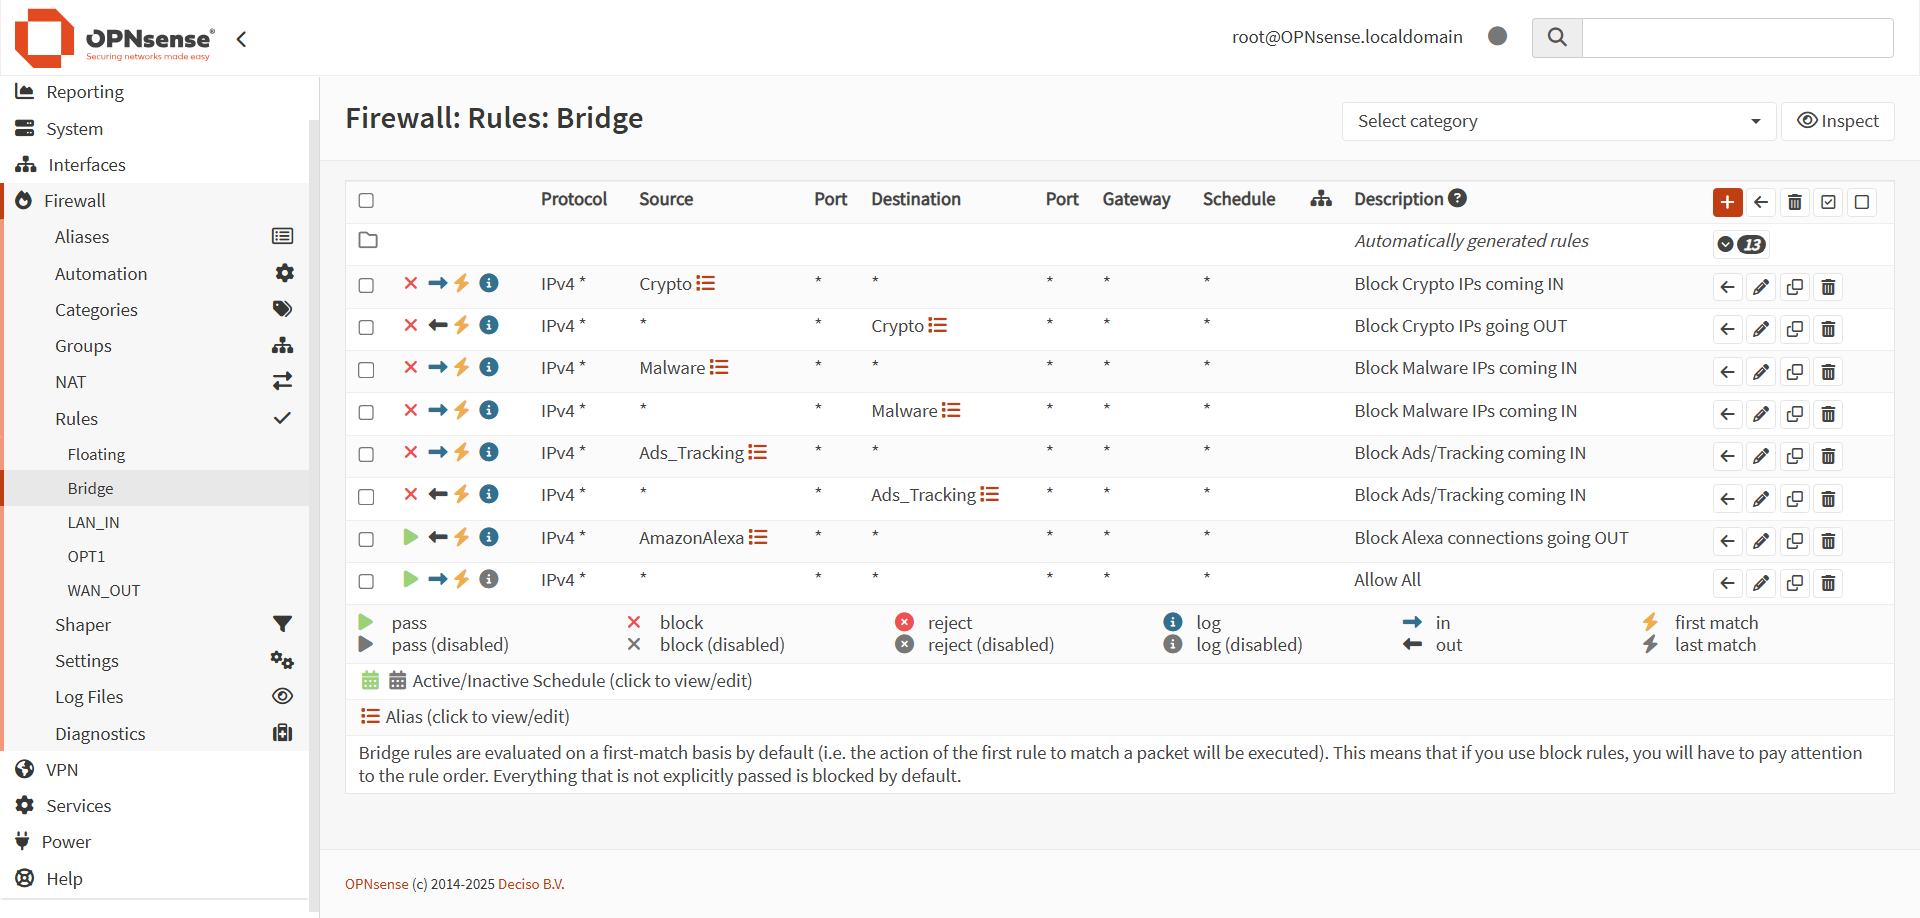
Using the aliases allowed me to block large swathes of IP addresses without much issue. The Allow All rule at the bottom ensures that all non-rule matching traffic goes through, allowing for proper connectivity.
With this setup, I moved on to provisioning Suricata IPS.
Implementing Suricata IPS
Thanks to the aforementioned Transparent Filtering Bridge tutorial, configuring Suricata was also simple.
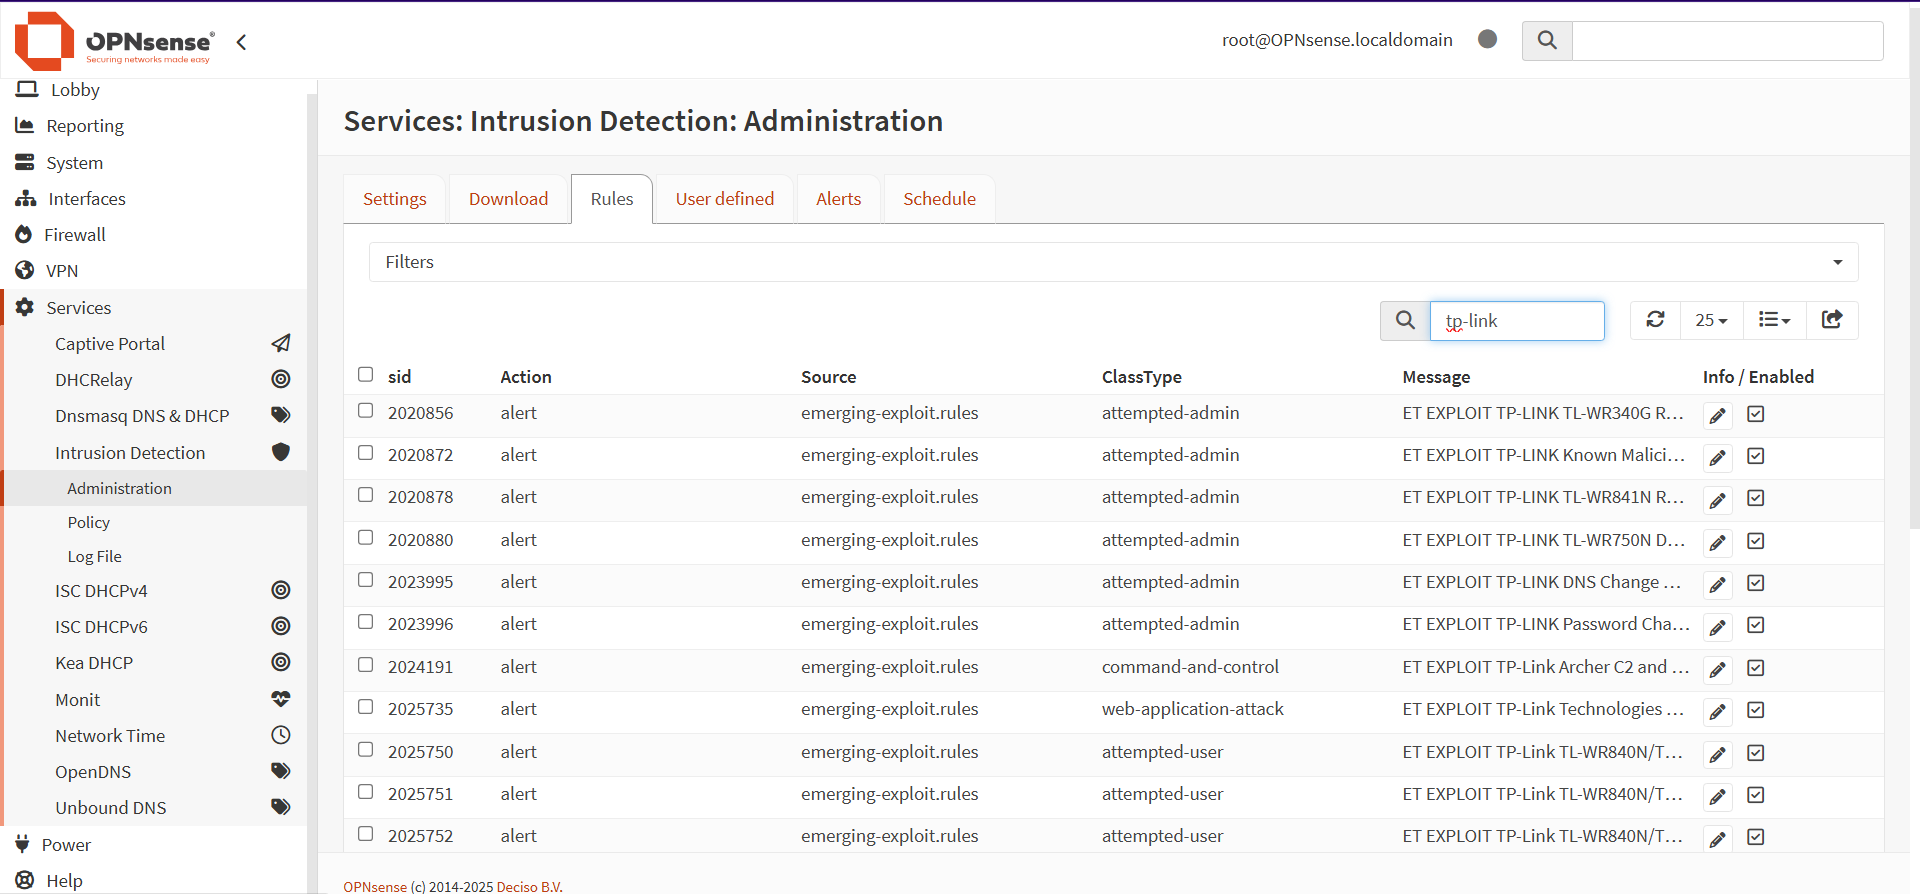
With the wide range of rule lists available, it was somewhat challenging to figure out the best sets for my use case. Thankfully, I found a Proofpoint document explaining the Emerging Threat list categories, which allowed me to pick a smaller subset of the full ruleset list.
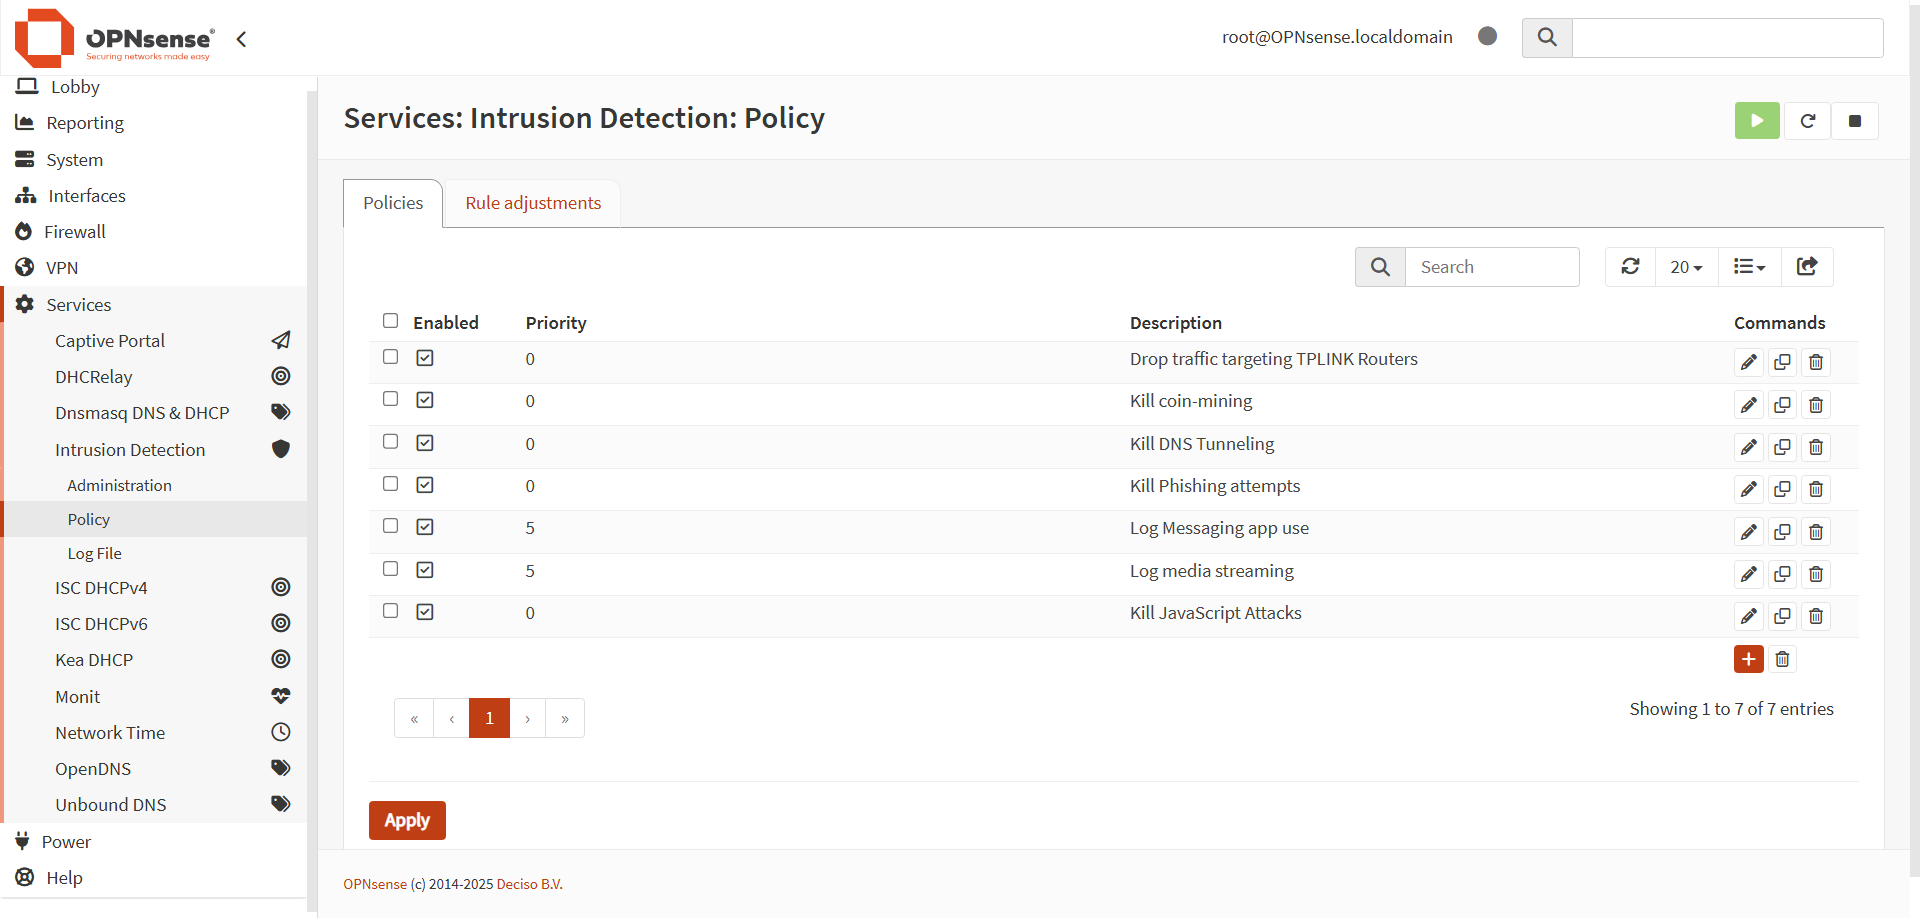
OPNSense's implementation of Suricata includes Policies, which allow users to simplify the detection rule process. For example, the first policy on the list applies to malicious traffic targeting TP-Link routers, by using the affected_product field, which is just one of at least 20 different fields that you can use to fine tune a set of rules to match your systems.
To start off defending a home network, I decided to focus on a few primary attack vectors:
- The router.
- Crypto-miners (in case any had gotten on to the network).
- DNS tunneling (an exfiltration vector I find interesting).
- Phishing (because it's ubiquitious.
- JavaScript attacks (because JS is a blight).
In addition, I implemented some pure monitoring alerts based on OPNSense's own rule lists, just to test that functionality and see if I needed to add more policies to address media sharing and messaging traffic.
Validating the Bridge
With the bridge and Suricata configured, it was time to validate that traffic was coming in and out of the network.
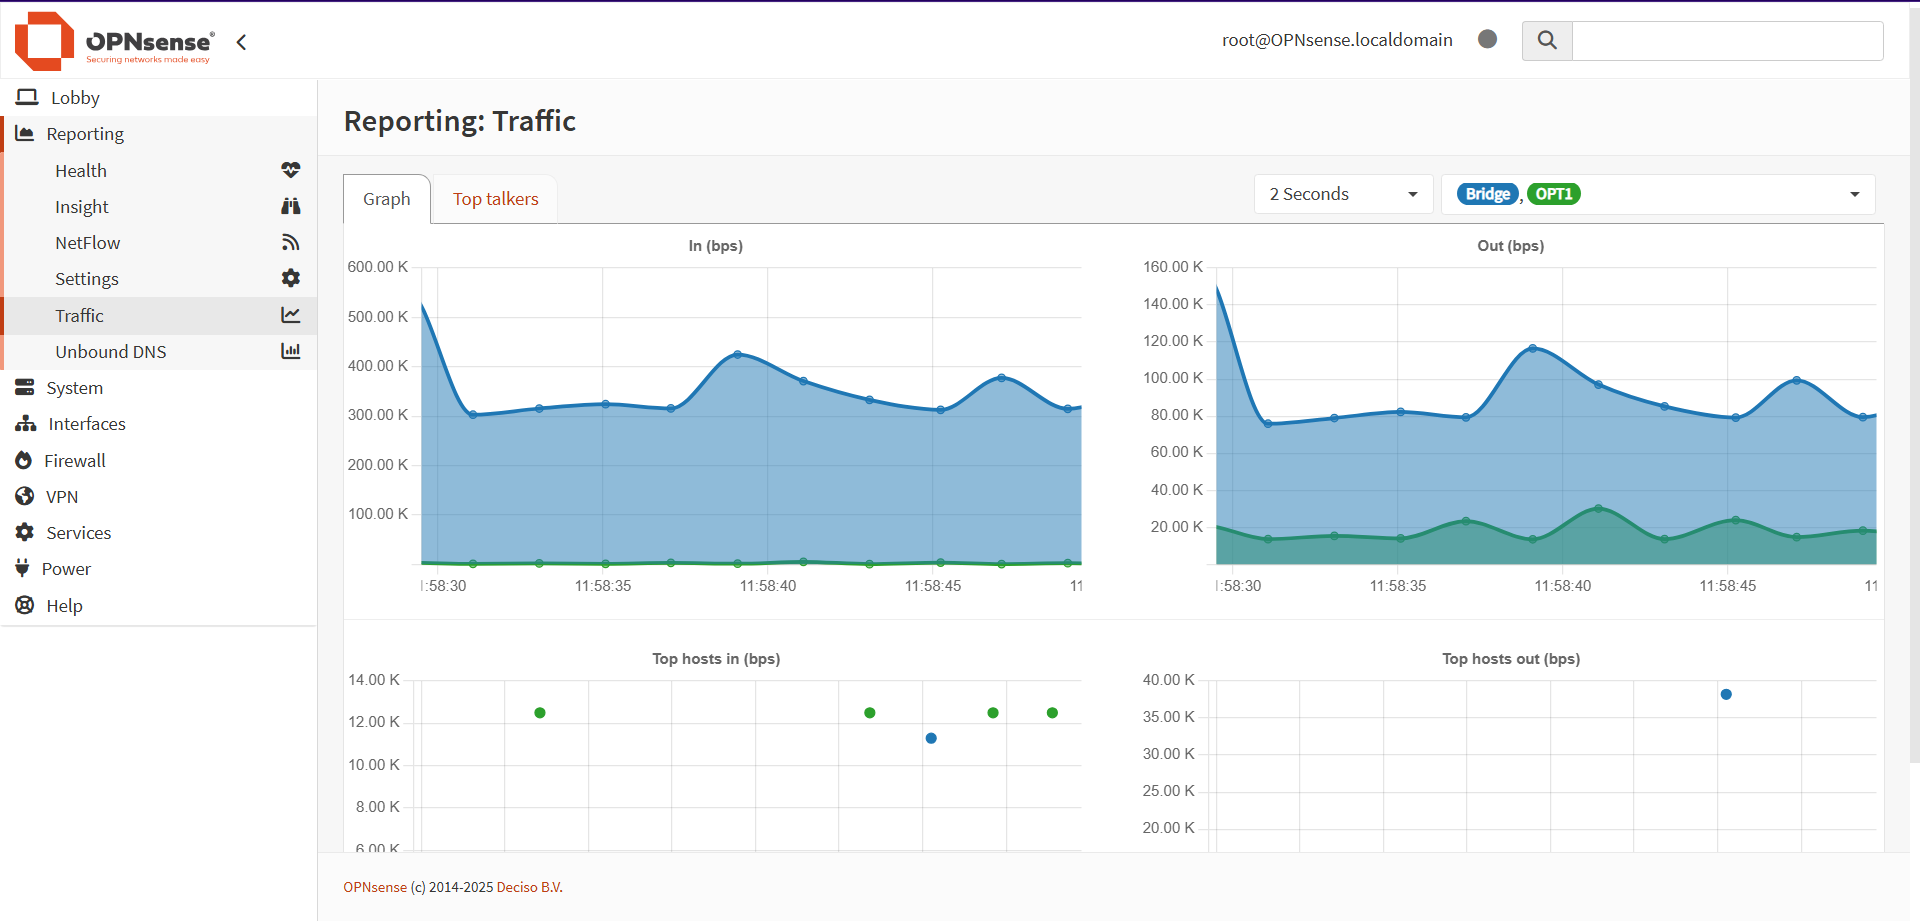
Understandably, there was a lot more total traffic going in than there was coming out, with the exception being the WiFi interface, which was pumping out a decent amount of traffic to my computer as it updated the graphs every 2 seconds.
To get more information, I decided to examine the Top Talkers tab:

While none of the traffic was particularly noteworthy in terms of totals in or out, there were some interesting IP addresses, which will bear exploration in the future.
Figuring Out Connectivity Issues
One persistent issue with the WiFi connection was that, despite finally having a management connection through the router to any device I needed, the miniPC would eventually become inaccessible after some amount of time.
Unlike earlier iterations of the problem, there was a simple solution - reloading the various services via the console. Once that was done, the WiFi interface would be reenabled.
However, that required physical access to the miniPC and a keyboard. Since this seemed to be a recurring issue, I needed an automated way to address the issue. Luckily, OPNSense has built in provisions for `cron` jobs, so I configured a job to execute every 6 hours, starting at midnight, as a test. This job would restart the WiFi interface, which would hopefully resolve the connectivity issue.
Since the time period between 6AM and 6PM is the primary stretch of time when I would need to access the management interface, having only 4 restarts in a day would be sufficient as a test. If the time outs occurred on a consistently rapid basis, I could then adjust the period between restarts down as needed.
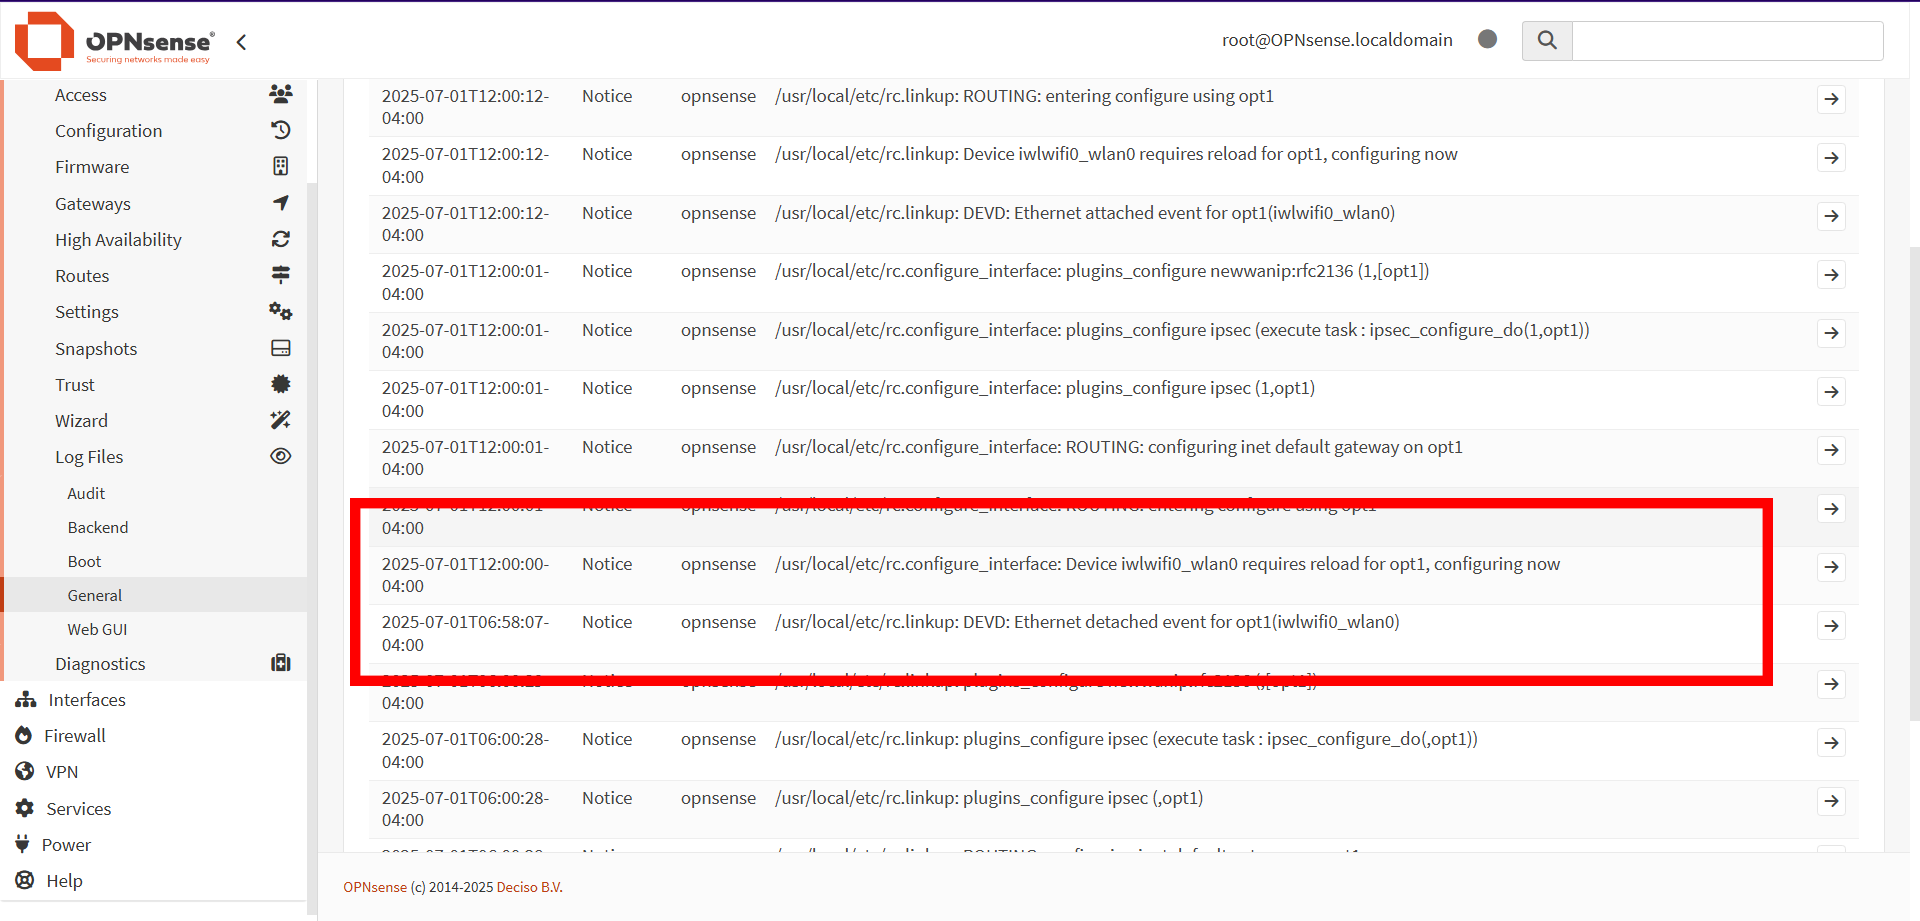
Based on the above log, what is happening is that the "Ethernet detached event" is when the interface loses connectivity for whatever reason, then rebooting the interface updates the configuration to what it should be.
Maintaining an active (or even semi-active) session seems to prevent the Ethernet detached event, which means even a browser that that's suspended all day might be able to solve the problem.
The Next Steps
With all the major technical concerns addressed, it's time to stress test the bridge. At least a week and a half of standard network traffic should hopefully be enough to put the bridge and the miniPC through their paces. Once that's done, I'll examine the logs and see if I need to establish new rules to either test detections or block traffic.